New Facebook Link Preview Change policy went into effect in July of 2017. Facebook now automatically pulls the original image and description from the article you are sharing.
The original goal of the change was to combat the fake news phenomenon.
However, it had a bigger impact on the content marketers.
If you are one of the content creators who followed a content maximization best practices, you learned that using different images for your articles is a lot harder now.
Harder, but not impossible.
The link preview policy change made an impact on our internal content sharing processes. But, like the rest of the entrepreneurs, we are used to changes and are great at adapting to it.
3 ways to maximize your content despite the latest Facebook link preview policy change
If you cannot fight it, embrace it, right?
So we went hard to work looking for workarounds and best practices to combat the impact of the change.
In the process, we discovered additional best practices that we summarized for you (including the little-known tip that will make you look like a social media pro!!)
1 – Optimize Your Blog Content for Facebook sharing
Ensuring that your blog post is optimized for social sharing is a “must have” for all content creators. It was a requirement long before the Facebook Link Preview policy change.
While this sounds like a very basic best practice, we are surprised to see many blogs ignoring it.
A couple of simple tweaks introduced to the blog will likely increase your social traffic at least 3-5 times. It will also entice more people to share your content.
Social Sharing Buttons
Social sharing buttons make your content easily shareable. If you are running a site on WordPress, you can use one of the 11 best social media plug-ins designed for it.
Most of these are very similar in functionality, so do not spend a lot of time researching the perfect one. It is best to install one sooner rather than later.
MetaTag Description
You also want to be in control of how your content appears on social media. Luckily, there are tools that can help you with this task.
Yoast CEO is one of our favorite tools for managing social media descriptions. It guides you through many of the SEO requirements in a very intuitive way.
It has quite a bit of built-in functionality to improve quality of your content. For example, it scores the readability of your copy. Making it more reader-friendly.
Yoast also guides you through creating social media-ready meta tags. After you are done with your blog, take 5-10 minutes to write a compelling social media description. It will make your content more noticeable.
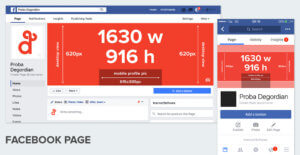
Featured Image
Images improve your blog SEO and readability. When you plan images for your blog, keep social media sharing in mind.
Research the right social media-ready dimensions for each of the platforms.
Facebook is notorious for changing their requirements, so we recommend checking the Facebook Image Size Guides frequently to stay current.
2 – Workaround to update images on your posts
If you are sharing 3-rd party articles from other influencers in your field, you will have little control over what their images they use.
With the new Facebook Link Preview policy, this will mean that you have no control over how your Facebook page looks like.
Follow these 3 simple steps to change the images appearing in your posts.
Step 1 – Add the image you want to share
Step 2 – Write the post and add the URL of the blog or article.
Step 3 – Publish or schedule your post.
Since your post will now appear as “image” on Facebook, it may enjoy higher reach. The challenge is that a lot of people may miss the URL.
If your goal is to drive more traffic to your website, refer to the next tip! 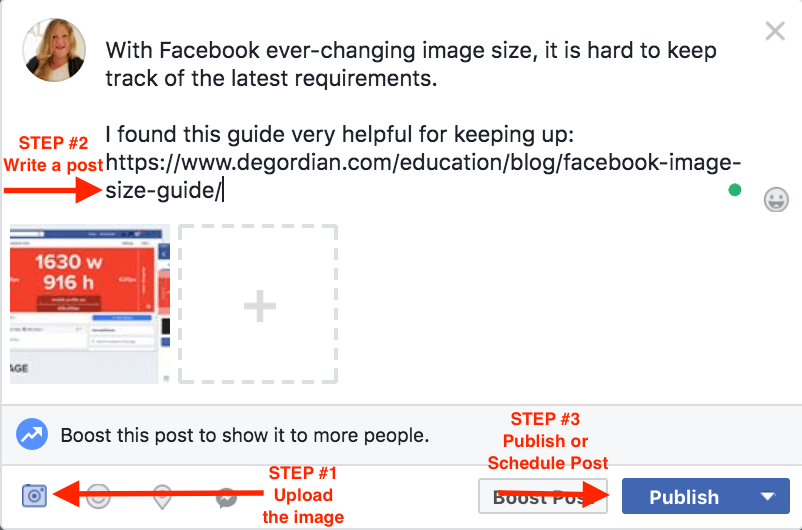
3 – Add Call to Actions to your Facebook posts
Posting your articles with different images will likely increase your reach, but it will reduce traffic to the site.
We found two simple (but little known) best practices that will significantly increase your web traffic. More importantly, they will make you look like a social media pro!
Add Call to Action to your Posts – Free Option
Social Media posts with additional Calls to Action stand out from the rest of the post and attract the attention of users.
While you will rely on the same functionality used for creating ads on Facebook, there is an option to create these entirely for FREE.
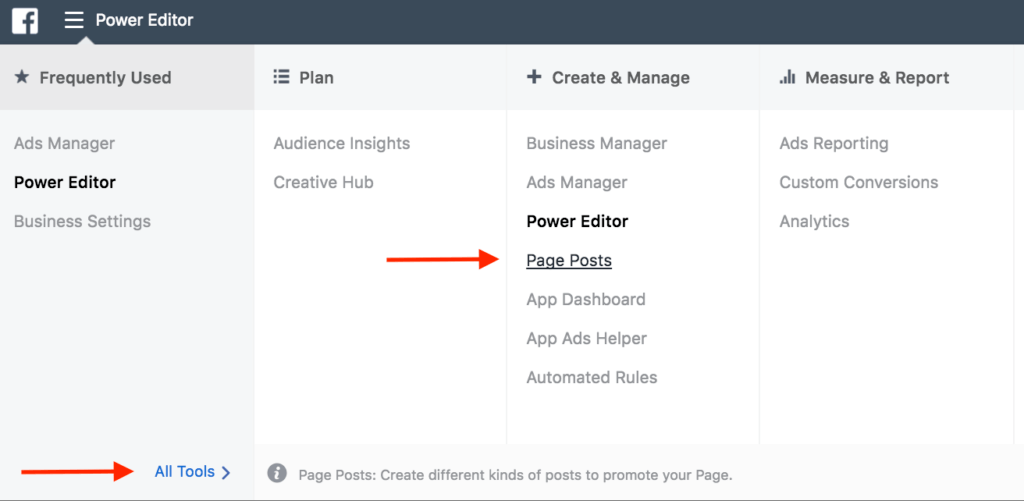
Step 1: Login to Facebook Power Editor
It is the same tool you would use to create and manage your Facebook ads.
Step 2: Click on “All Tool” link on the bottom and then select Page Post
Step 3: Follow the prompts to Create a Page Post.
Step 4: Choose the type of post you would like to create (very similar to creating a regular post via Facebook). Link post and carousel ads work best with this method.
Step 5: Select “Call to Action” Button drop down and add one of the available CTA options.
Creating a Page Post through this method will result in an unpublished post. It will then appear in the Ads Posts section of your power editor.
You can now post or schedule the post and it will go live on your page with a Call to Action included.
Add Call to Action to your Posts – Low-Cost Option
The free option works best when you are promoting a link to multiple images. If you are trying to promote a video, the Call to Action button is not available.
You can create your ads via Power Editor (or Ads Manager – a lot simpler). Your budget can be as low $1/day. You can even turn off your ad after a few days without impacting the post functionality.
To create Call to Action for Video posts and Image posts, follow these simple steps:
Step 1: Publish the post on Facebook directly (you can also use the Power Editor to create your post as described above)
Step 2: Choose campaign goal (engagement or video views) and select your targeting. You can keep your targeting fairly broad for your initial ads.
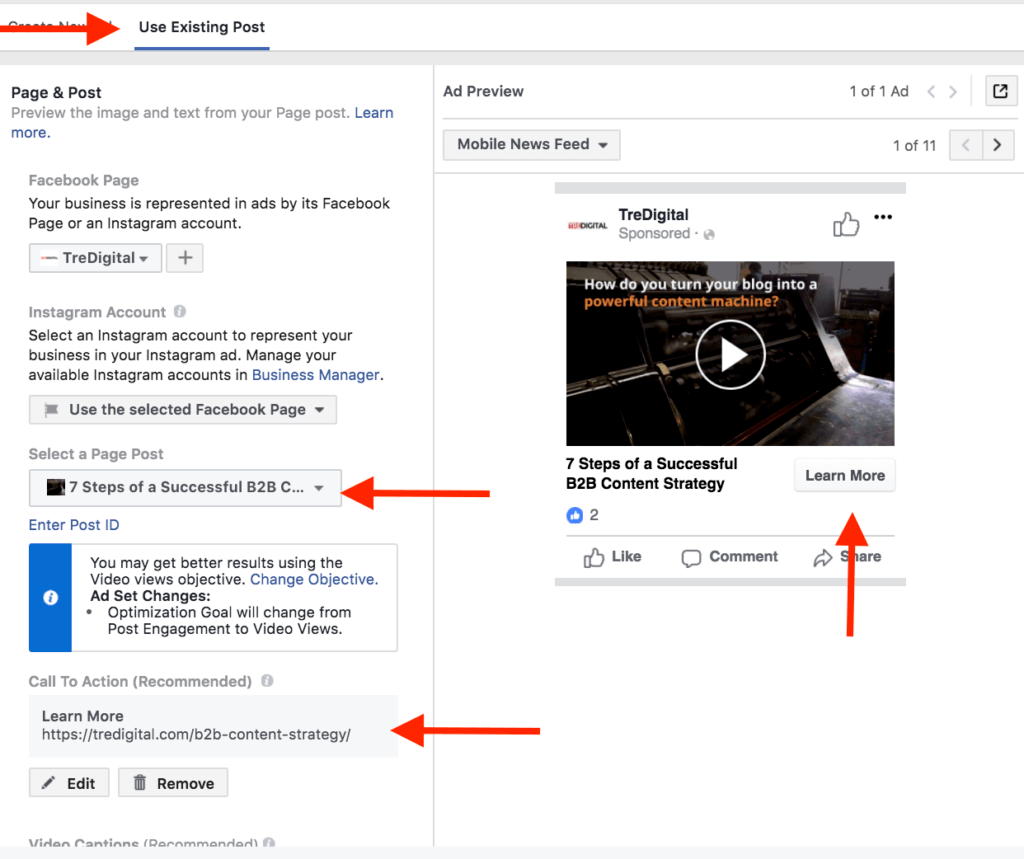
Step 3: Select “Use Existing Post” and then select the post you would like to use.
Step 4: Add the Call to Action button and update the description.
Follow the prompt to confirm and finalize the ad. While it still has to go through the Facebook ad review process, the call to action button will likely appear on your post right away.
CONCLUSION
The best way to keep up with the ever-changing social media world is to keep experimenting. Keep your end goal in mind and look for the workarounds and best practices that will help you achieve your goal.